PugBase Planning: turn an idea into a plan your AI agent builds - and your team
A complete, start-from-zero guide. By the end you'll be able to create a plan, connect your AI coding agent, watch it build in real time, add features later, and hand the whole thing to your team. No prior PugBase experience needed.
What is this, in one line?
PugBase Planning turns a request (or a video / PDF / doc) into a structured, ready-to-build plan - then connects to your AI coding agent (Claude Code, Cursor) so the agent builds it in your repo and ticks off progress live, where your whole team can watch.
Most of us already do half of this by hand: we describe a feature, hand it to an AI agent, and then... lose track of what it actually did. PugBase closes that loop.
The big picture (the loop)
flowchart LR
  plan["Plan\n(describe it)"] --> build["Build\n(your AI agent, over MCP)"]
  build --> track["Track\n(live status board)"]
  track --> extend["Extend\n(add a feature)"]
  extend --> build
-
Plan - describe what you want; PugBase writes the plan (overview, rules, API contract, data model, task checklists).
-
Build - your AI agent reads the plan over MCP and builds it in your repo.
-
Track - as the agent finishes each task it ticks it off; you watch progress live on the Status page.
-
Extend - add the next feature; it plugs into the same plan as its own tracked increment.
Part 1 - Create your first plan
Step 1 - Open "Plan with AI"
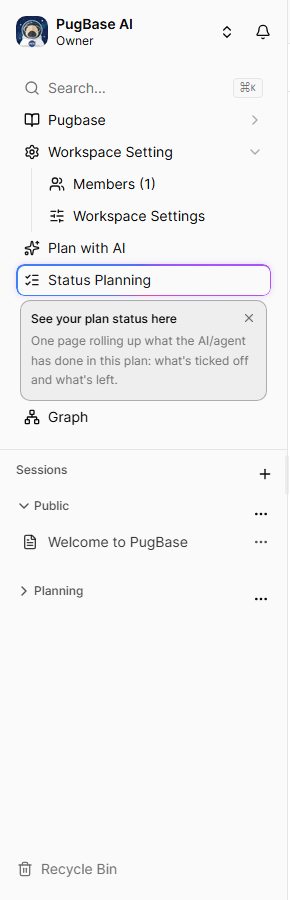
In the left sidebar of your workspace, click Plan with AI.
Step 2 - Describe what you want to build
A dialog opens. Type what you want - be specific about the stack and features. Here's a good example you can copy to follow along:
Build a full-stack Todo web app.

Stack:
- Frontend: React 18 + TypeScript + Vite, Tailwind CSS.
- Backend: Node.js + Express + TypeScript.
- Database: PostgreSQL via node-postgres (pg).
- Auth: JWT stored in an HttpOnly cookie.

Features:
- Email + password sign up and log in; stay logged in across refresh.
- Each user manages only their own todos.
- A todo has a title, description, done status, and due date.
- List, create, edit, toggle done, and delete a todo; filter by all/active/completed.
- Responsive UI for desktop and mobile.
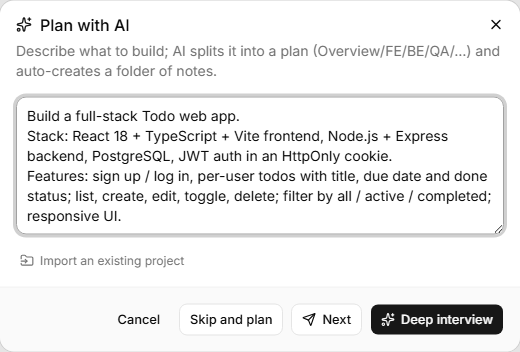
Step 3 - Choose how deep to go
| Button | What it does | Best for |
|---|
| Skip and plan | Plans immediately from what you typed | You already described it well |
| Next | Asks a few sharp clarifying questions first | Recommended - a sharper plan |
| Deep interview | A longer business + technical interview | Big or fuzzy projects |
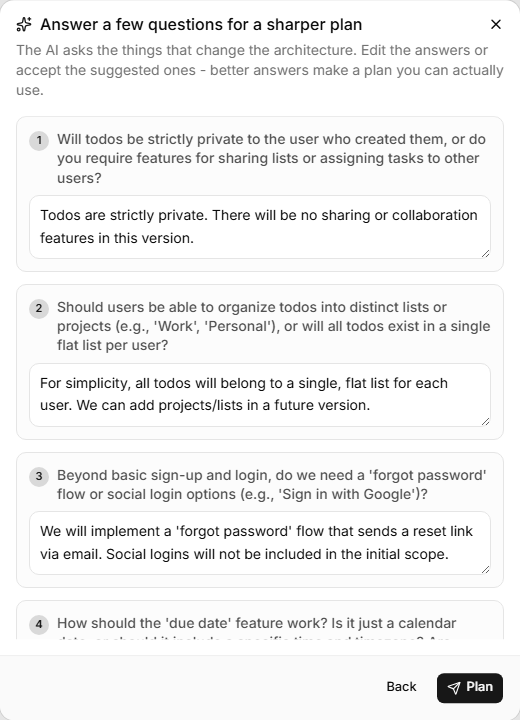
Step 4 - Answer the questions (recommended)
If you chose Next, PugBase asks the questions whose answers most change the plan. Each one comes with a suggested answer you can accept in one click or edit.
Step 5 - Let it build the plan
Give it about a minute. A new Planning session appears in your sidebar, filled with cross-linked notes:
| Note | What it is |
|---|
| AGENTS.md | The entrypoint contract - the rules + a map of which note holds what. Your agent reads this first. |
| Overview | The goal, scope, and how the systems fit together |
| Constraints | The binding decisions every builder follows (stack, conventions, limits) |
| API Contract | Every endpoint: method, path, request/response shape, errors |
| Data Model | The database schema, as an interactive diagram |
| Architecture | A live flowchart of the systems and how they connect |
| Tasks (Frontend / Backend / QA) | Per-discipline checklists with acceptance criteria |
| Risks | Open questions and things to revisit |
These notes are written to be read by an autonomous coding agent - decisive tech choices, clear acceptance criteria - and they cross-link each other so nothing is defined twice.
Part 2 - Connect your AI coding agent
This is the step that makes the plan executable. MCP (Model Context Protocol) is the open standard that lets an AI agent talk to tools. PugBase ships an MCP server, so there's nothing to install on PugBase's side.
Step 1 - Create an API key
Go to Settings -> Developer and click Create API key. Give it a name and pick the workspace your plan lives in - a scoped key only touches that one workspace, so your agent always hits the right plan and you never pass a workspace id.
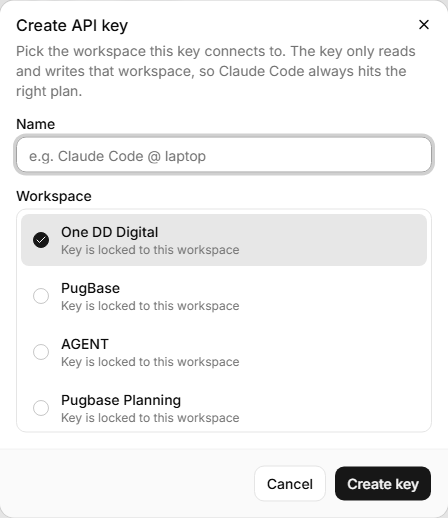
Copy the key when it's shown - it appears only once and looks like pgb_.... Treat it like a password.
Step 2 - Point your editor at PugBase
Option A - project file (recommended). Create a .mcp.json in your project root:
{
  "mcpServers": {
    "pugbase": {
      "type": "http",
      "url": "https://pugbase.io/api/mcp",
      "headers": { "Authorization": "Bearer pgb_..." }
    }
  }
}
Option B - one command:
claude mcp add --transport http pugbase https://pugbase.io/api/mcp --header "Authorization: Bearer pgb_..."
Connect Claude Code to PugBaseConnect Claude Code (VS Code or CLI) to your PugBase workspace over MCP. Claude reads your plan, writes the code, and reports results back into notes your team can comment on.
 pugbase.io
Step 3 - Reload and approve
Reload your editor, then approve the pugbase server when prompted. Your agent can now see the PugBase tools (get_plan_spec, list_plan_notes, mark_task_done, push_result, and more).
Step 4 - Tell your agent to build it
Open your project in the agent and paste a prompt like this:
You have the PugBase MCP server connected. Build the project it has planned for me.

1. Call get_plan_spec to read the whole plan. Read the AGENTS.md contract FIRST, then the linked notes - treat them as the source of truth.
2. Implement the app in THIS repo exactly as the plan describes.
3. As you finish EACH task, call mark_task_done for it right away - one at a time, not batched at the end.
4. When an area is done, push_result with a short summary.
Part 3 - Watch progress live on the Status page
Step 1 - Open the status board
In the sidebar, click Status Planning. You'll see an overall progress bar, recent activity, and a progress bar per task note - plus an Export button in the top-right (covered in Part 5).
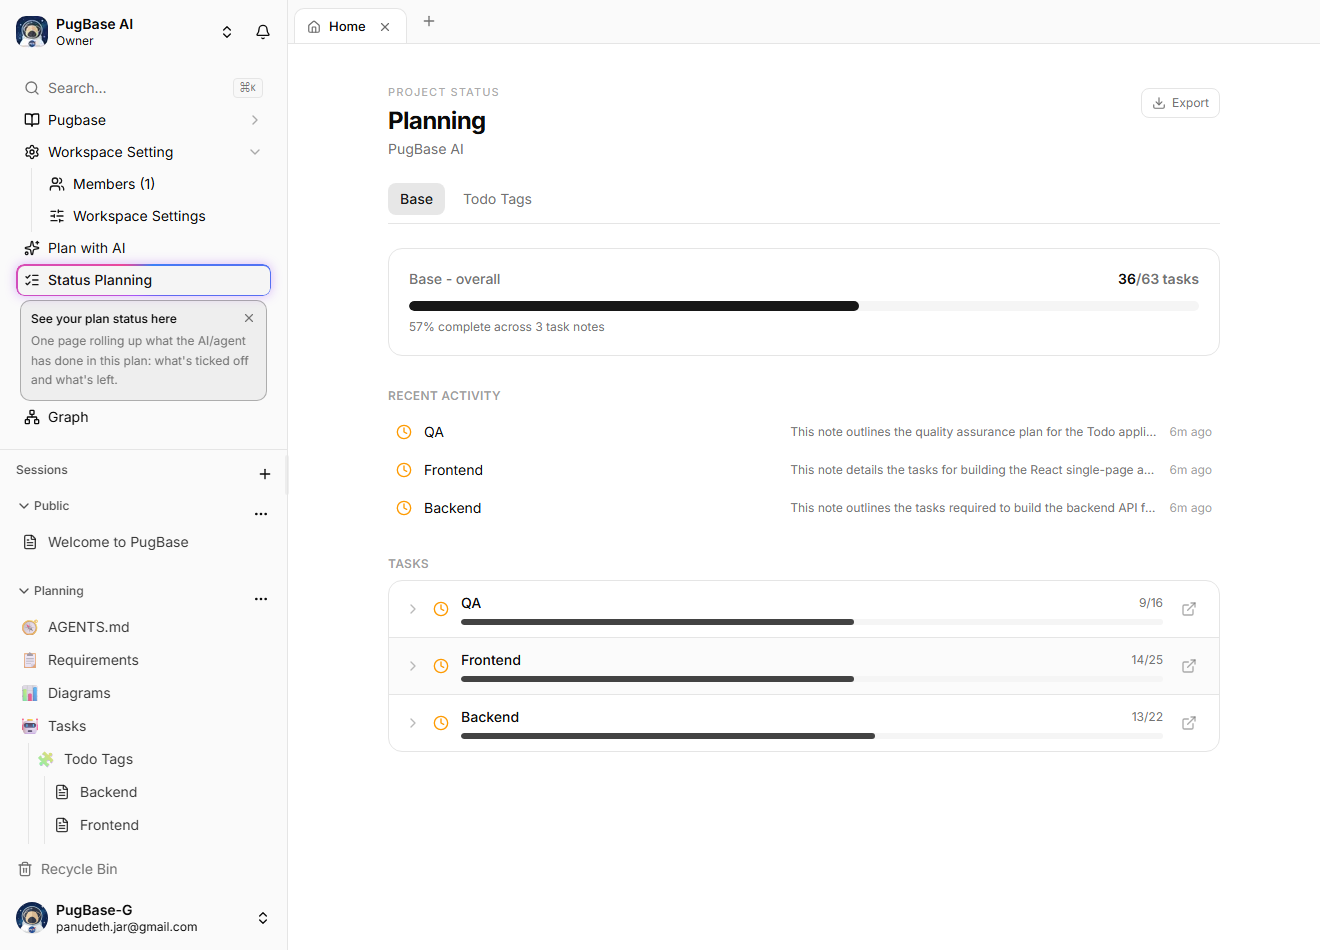
Step 2 - Watch it move, task by task
As your agent finishes each task and calls mark_task_done, the checkbox ticks and the board updates live - no refresh needed. Click any note to expand its individual subtasks. This is the whole point: your non-technical teammates can watch the build happen without reading a single line of code.
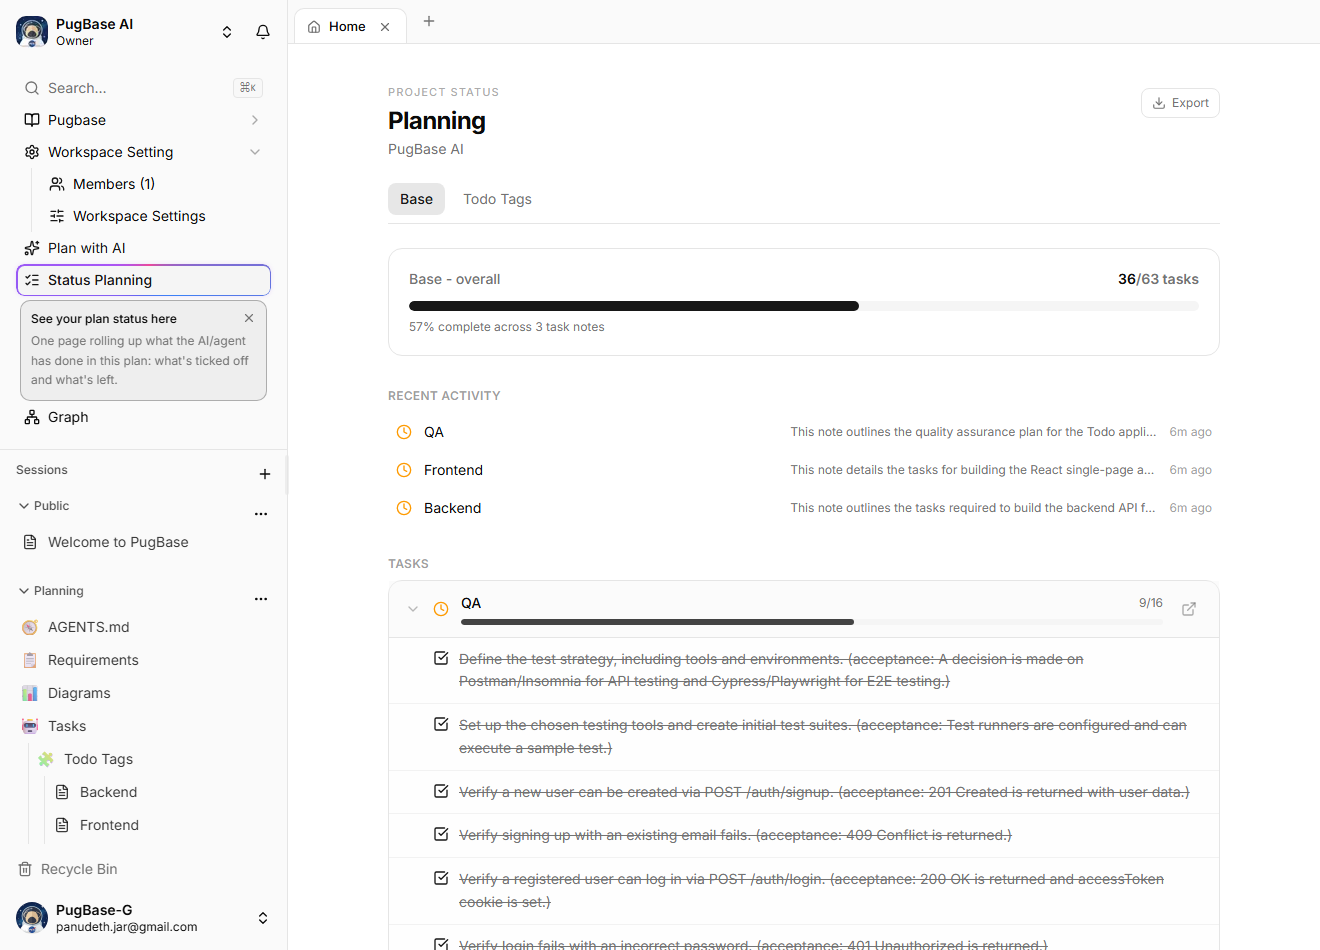
Tip: keep the Status page open on a second screen while your agent works.
Part 4 - Add a feature later (increments)
Your first plan is the Base. When you want more, you don't start over.
Step 1 - Plan with AI again
Click Plan with AI and type just the new feature, for example:
Add tags: users can create tags, attach multiple tags to a todo, and filter todos by tag.
Because a plan already exists, PugBase shows an "Adding to existing project" note and adds the feature - reusing your existing stack, conventions, and contract instead of re-planning from scratch. It names the feature itself and files its task notes under a Tasks/<Feature> sub-folder.
Step 2 - Track it as its own tab
Back on the Status page, the new feature shows up as its own tab next to Base. Click it to see only that feature's progress.
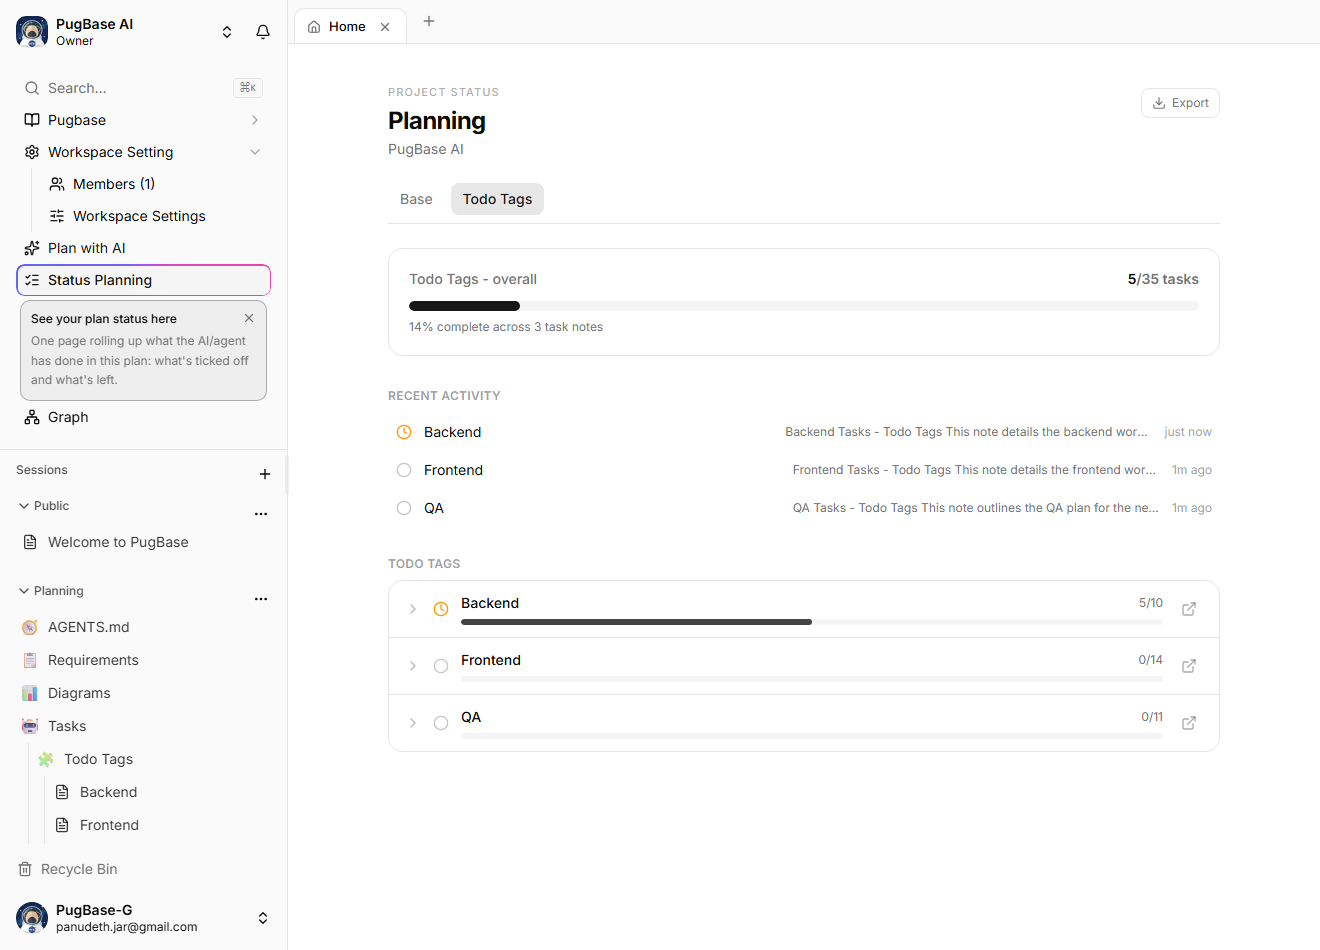
Part 5 - Hand the whole plan to your team (Export)
On the Status page, top-right, click Export (you can see the button in the Status screenshots above). You get the entire plan as one Markdown file - overview, constraints, API contract, data model, and every task - always reflecting the current notes. Drop it in your repo as SPEC.md, or share it with anyone.
Bonus - already have a project? Import it
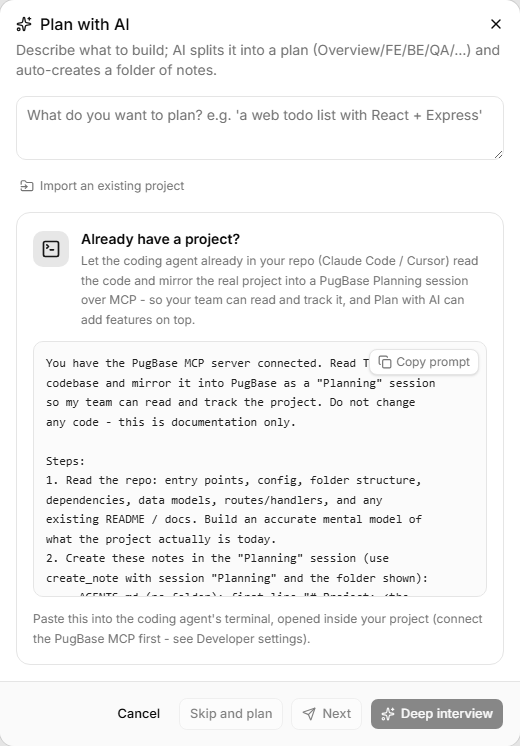
If your codebase already exists (nothing to do with PugBase), you can mirror it in and plan on top of it.
-
In the Plan dialog, click Import an existing project (it's also under Settings -> Developer).
-
Copy the prompt it gives you and paste it into your coding agent, opened in your repo.
-
The agent reads your code and writes an accurate plan (AGENTS.md, Overview, Constraints, Data Model, API Contract, Tasks) into a Planning session.
From there, "add a feature" works exactly the same as above.
Who is this for?
-
Solo builders using a coding agent who lose track of what it actually did.
-
Teams where non-devs need to see progress without reading code.
-
Anyone turning a meeting, PDF, or long video into an actionable, trackable plan.
Recap
-
Plan - describe it, get a structured plan.
-
Build - connect your agent over MCP; it builds in your repo.
-
Track - watch tasks tick off live on the Status board.
-
Extend - add features as tracked increments, then export the whole thing for your team.
Works in English and Thai, and it's free to start. Point it at your next project and let your agent do the building - while everyone can see exactly where things stand.
By PugBase-G
 PugBase
 PugBase-G·July 17, 2026